Web developer? Expand your product portfolio with our service

What you charge your customers for your services is up to you.
Resellers can rebrand our system and offer it as part of their own portfolio, or sell it as part of a larger project. As a reseller you take care of the initial set up of your clients’ accounts as well as billing, customer service and any additional services. If you only want to attract customers and let us handle the customer service and billing, please look at the affiliate program instead.
Why become a reseller?
Personal business model
You are free to choose your own business model, which can range from just helping with the setup to building a fully-fledged site of which our system is a small part.
20% Discount
You receive a 20% discount on the total amount charged to you and there is no participation fee.
Flexible Pricing
What you charge your clients for your services is up to you. Comparable services on the internet charge $30 – $150 per month, with additional setup fees depending on the services provided.
Fully white labeled
SuperSaaS can be fully white labeled, no reference to SuperSaaS will be visible to your clients, and we only communicate with you.
How does it work?
A reseller typically has one account for himself (this can be a free account) and one additional account for each of his customers. This allows you to give your customers administrator access to their client accounts. The customer can safely do things like change the password or account name; the reseller will still have access to the account via his reseller dashboard.
Set up a reseller account
- Create a regular SuperSaaS account if you don’t have one already (this can be a free account). You typically do not want to upgrade your customer’s account to be the reseller account. While it’s possible to do so this will not give you the option to fully white label and will not give you a separate reseller login.
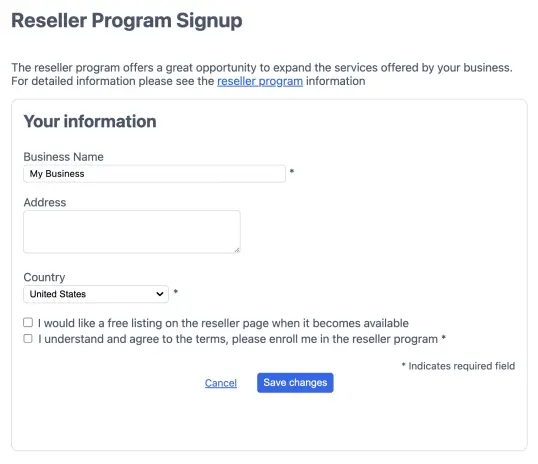
- Convert the account to a reseller account via the “become a reseller” button below. You will now see a Partner Dashboard item in the menu of your SuperSaaS dashboard. On the partner dashboard you can create a new client account, link existing accounts and login to linked client accounts.
Connect the client account(s)
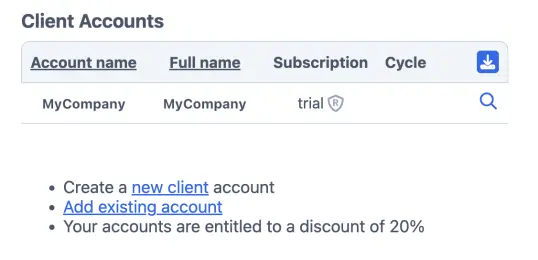
- Create a new empty client account. To create a new client account, click on the “new client” link. Enter the relevant details and click on “Create account”. If you use an email address that has not yet been used on our system before an activation link will be sent to that address.
- Connect an existing account. To add an existing account, click the link “Add existing account” and enter the “Account Name” and “Password”. If you do not know the password of the account you want to add, you can ask the administrator of that account for a “transfer key”. You can find the transfer key by pointing your customer to the given link and asking them to send the transfer key back to you. You can subsequently enter that link to add the account to your reseller account.
Configure the client’s account
- Log in to your client’s account. Once you’ve added a client account, you can log in via the button next to the client account on your dashboard. You will see “logged in as reseller…” in the top right corner.
- Set up your client’s account. Configure the client account according to their wishes. The documentation section provides you with background information on all system settings.
-
Remove references to SuperSaaS. The moment an account becomes part of a reseller account most references to SuperSaaS are automatically hidden.
There are a few additional things you may want to change yourself:
- Use your own domain name instead of supersaas.com. Unless you don’t mind our name being visible in the domain you will need a separate domain name for each client account. They can be subdomains of the same domain, such as client1.yourcompany.com and client2.yourcompany.com
- Replace the favicon. A favicon is the little graphic at the left of the web address in some browsers, it can be replaced with your own
- Change the outgoing email address. The “From” address is noreply@supersaas.com by default, but it can be changed to the client’s (administrator) address. A limitation is that the email headers will still reveal that it originated at our servers, this is necessary to comply with anti-spam measures.
- You can optionally add the customer’s logo and change the colors to fit his corporate color scheme
All of these things can be changed from the Layout Settings screen; the documentation contains detailed instructions for changing the domain name and favicon. Note that settings that can lead to references of SuperSaaS being displayed by default are only available when logged in as a reseller, therefore the customer is not able to change these settings.
The support information on the client account is shown to the end-users of the customer, but if the customer clicks help whilst logged in as an administrator, they will be shown the support information from your reseller account. Therefore, you would want to set your own contact information on the Layout Settings page of your reseller account.

- Determine what features should be hidden. By default, most features that would expose the user to SuperSaaS branding are hidden from the interface. If this is not important to you, you can relax this setting so that the administrator of the client account can change those himself. You can find an option to adjust this by clicking the spy glass icon next to the account name on your Partner Dashboard screen.
- Confirm it works. You may want to log in pretending to be your client to confirm everything looks as intended as explained in the next section.

Give access to the client
Once you are happy with the setup you can change the administrator email on the Account Info page to the client’s email and give them the account name and password. Your client can log in on the SuperSaaS home page, but if you’ve set up a custom domain then you probably want to send them there. If you use just a custom domain then there is no need to give a full URL to a schedule because a list of schedules will be displayed (if there is just a single schedule it will redirect to it).
If you want to send someone straight to a specific schedule then you can find the URL of that schedule on its configuration page, “Overview” tab. Once on a schedule they can then click the login link in the top right corner, and then click “Dashboard” to get to the dashboard.
If you want to direct someone straight to the administrator interface without going through a schedule first you can also send them to the URL of the dashboard directly: www.example.com/dashboard
Paying for the service
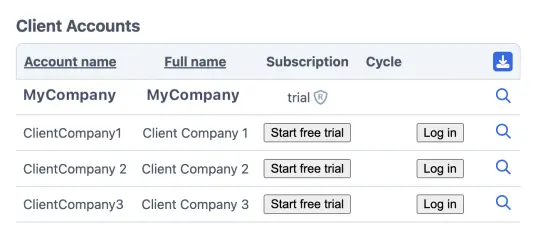
When client accounts are first created they will be “free” accounts, with the corresponding limit of 50 appointments. Free accounts will show a “Start free trial” button which changes the free account into an unlimited trial account for the next 7 days. This means it behaves as if it has a subscription and allows you to show the account to a potential customer with no advertisements, the syncing options enabled, and no limit on the number of appointments. After the free trial the account reverts to the free version, unless a subscription has been purchased in the meantime. The button can only be clicked once per account.
When your client wants to start using the paid service the reseller pays SuperSaaS in the same way a regular customer would pay for the service, albeit at the reduced price. How the reseller invoices his clients for their use is up to him. The reseller can set his own price, of course, whether it be fixed or monthly recurring, and there is no need to follow the division in the packages that SuperSaaS uses.
When a client exceeds the limits of his current subscription a notification will be sent to the administrator address on the reseller’s behalf, with a cc to the reseller, so they understand what is happening. When you are signed in as reseller you can sign up for any of the regular subscription packages. Note that you have to be logged in as a reseller to change the subscription.
Managing resold accounts
You can have as many free client accounts as needed for demonstration purposes. You can delete a client account at any time by signing in to the account and selecting Remove on the Subscription Status screen.
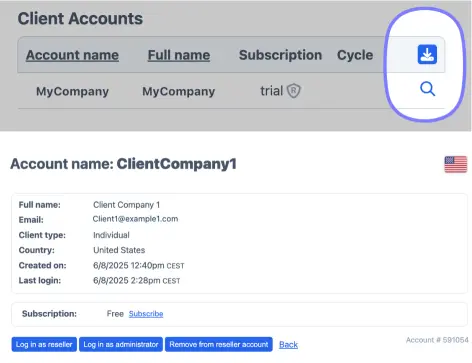
On your Partner Dashboard you can disconnect a client account to become a regular account again, in case you want to transfer ownership to someone else (it will no longer receive the reseller discount unless it is attached to another reseller account). By clicking the spyglass icon next to an account you can find an option “Remove from reseller account” to change the account back to a regular account. If you do this on your main reseller account, all client accounts will revert to regular accounts.
With the download icon in the top right corner of the table on your partner dashboard you can download information about your client accounts to an Excel or CSV file to use for your own administration. If you have more than two client accounts an additional option will appear that allows you to download the invoices across all accounts into a single file.