All tutorials

Create a virtual queue to manage customer flow

Virtual queue

This tutorial shows you how to configure a virtual queue to manage traffic at a shop to minimize physical queues. It should be straightforward to adapt these instructions for another type of establishment to prevent too many people showing up at the same time.

This tutorial demonstrates the following customizations:

  • using a resource schedule as a simple sign-up form for a queue
  • modifying the resource schedule to allow multiple appointments per time slot
  • creating a QR code for use on handheld devices

You can view the result on the queue demo page. It’s possible to modify that page to make it appear as part of your site, but you can also integrate a SuperSaaS schedule as a so-called “widget”. A widget can appear as a small frame on your site, or as a small button, like this:

Setting up the schedule in 5 steps

Step Set up a basic schedule using the New Schedule Wizard

Before you begin

In order to follow the steps in this tutorial, you need to have an account. Creating a new account is free and all you need is a valid email address.

Select the appropriate schedule type

Click New Schedule in the menu on the right side of your Dashboard. You will be directed to the New Schedule Wizard where you are first asked to choose between a Resource, Capacity or Service schedule. For the queue we are building a resource schedule is a good choice. It’s possible to use one of the other types, but pick “Resource” if you want to follow along with this tutorial.

Decide how users can access the schedule

Next you will be asked whether users should be required to log in to access the queue. We pick “No log in necessary” since that’s easiest for customers. If you ask them to create an account that’s a bit more work for them but it will allow them to modify their appointment later.

Choose how many customers you want to schedule in one slot

For this example we pick one customer per slot. In a subsequent step you will be asked to define how large a slot is. So you can, for example, choose to have very small 1 minute slots with a single customer per minute, or you can create 10-minute slots and allow 10 users at a time, and both those would offer the same capacity. If you are unsure, just pick something, both values can be changed later, of course.

Name your schedule

The title you give to your schedule in combination with your account name forms the URL that your customers will see in their browser when they use your schedule. Provide a short but descriptive name for the schedule, for example pick the name of your shop and click Next. You can always change this (as well as your account name) but note that if you do so, the schedule’s URL will change accordingly.

Specify availability

For appointment length specify the length of a slot, we pick 5 minutes here, and check the box “All appointments have a fixed length”. Under the heading “When can appointments start?” select “At specific times” and copy the following: *:00, *:05, *:10, *:15, *:20, *:25, *:30, *:35, *:40, *:45, *:50, *:55 Adding these constraints will allow the system to show a nicer UI when picking a time.

Make adjustments so it looks like a queue

Clicking Finish creates an empty schedule and puts it online right away. We are going to make a few more adjustments to make this schedule suitable for our purpose. Click the Configure button, and select the “Layout” tab. At the option “Vertical scale for week and day view” select the option “10 min/interval”. Under the heading “Which views should be available?” deselect the “Month view” and click “Available time” as the default view. Click “Save changes” at the bottom of the page.

Next go to the “Process” tab and select the fields that you want customers to enter. We set “Full name” to required, and switch all the other ones to “Don’t ask”. If you want to capture your customers email or phone you could select that here. Under the heading “Where do we send the user after successfully creating a reservation?” pick “Send the user to a URL” and enter a link to a page on your site. Preferably this would be a page with some kind of “Thank you” message. In our example app. We send customers to a page that shows the queue, but that’s not as practical because customer names are hidden.

Finally, go to the “Access” tab and under the heading “Can a user see details of entries created by someone else?” select “The schedule shows no details…”. For a shop this would be the obvious choice for privacy reasons, but if you are setting this up for an office where people know each other you could decide to show the names on the list.

Step Try out the queue to see if it works as expected

To use your online queue as an administrator, click Use in the schedule menu. This button is only visible when you are logged in as administrator.

Virtual queue start

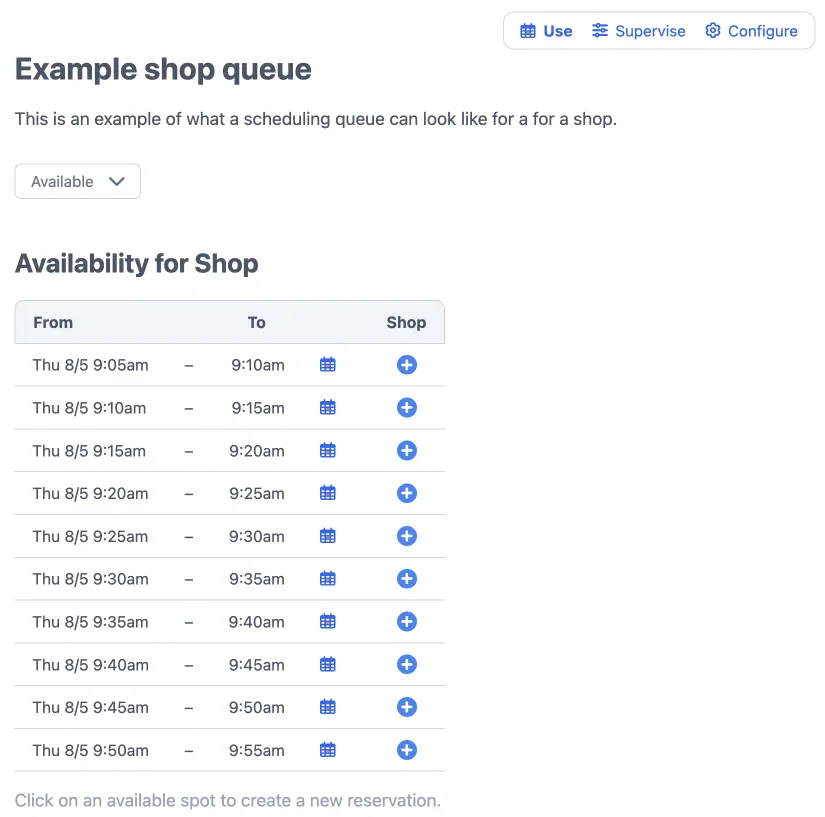
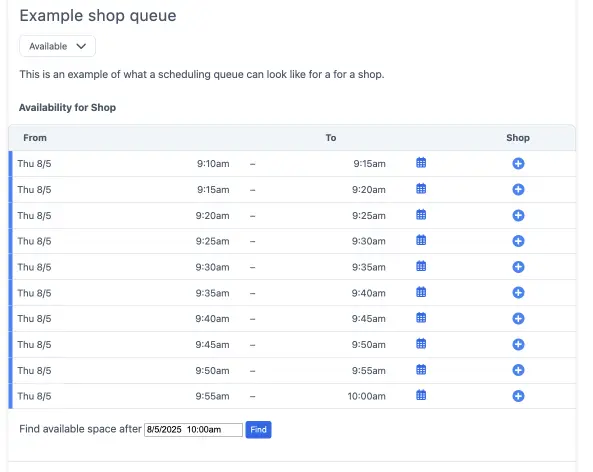
Regular users will see the same schedule but with fewer options. Also, most of your customers will be on a mobile device so it’s important to check what it will look like on a mobile.

You can view what a mobile user sees in your web browser by changing the “www” part in the URL of the schedule to “m”. So you would be able to see the mobile version of the example we are building here:
https://m.supersaas.com/schedule/demo/Shop

On a mobile phone it would look something like this:

Virtual queue on mobile device

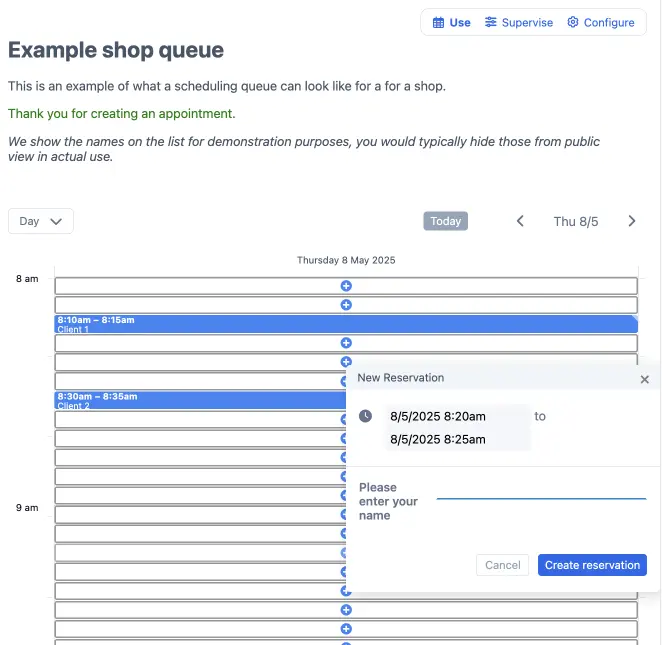
Go ahead and make an appointment to see what the process will look like to your users.

Step Adjust the configuration

You can adjust further settings to suit your requirements by clicking Configure.

Configure schedule layout

Make it look like it’s yours

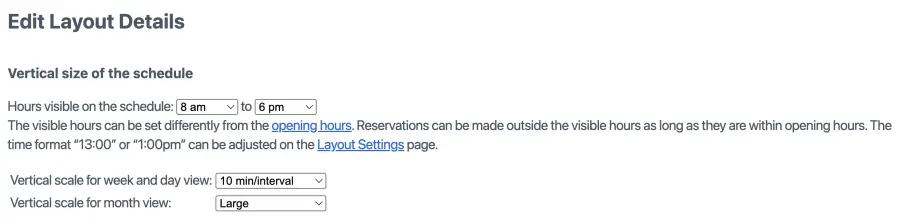
On the Configure page, Layout tab, you can add some text to explain the process. Here you can also adjust the colors to your liking, and the links to your website and Social media presence.

Adding staff members

On the User Management you can add superusers. You can allow superusers to view all the people in the queue and make changes to it. So this is a good place to create accounts for your staff.

Notify people

On the configuration page, “Process” tab, you can optionally enable email and mobile phone fields to capture that information for marketing purposes. This same page also allows you to send an email confirmation to yourself and/or to your customers. At the bottom of that page you can limit how far in advance people can book under the heading “How long in advance can a user add or change their reservation?”

Add variable length appointments

If the time spent in your establishment differs per customer you can provide a drop-down where they can specify an estimate. On the configuration page, “Resources” tab, select the option “The customer selects the length from a drop-down list”. In the text box that appears enter the different lengths that people can specify.

Adding more capacity

If you want to expand capacity of your queue you can add more time slots, or you can add more resources so that users can make multiple appointments per slot. Both options can be found on the Configure page, Resources tab. To add additional resources click the link “Enter a list” (it’s only visible if you have not added additional resources yet). There you can add a name for each resource, for example “Line 1” and “Line 2”. This will show up as separate options on the queue. It may be preferable to combine the multiple spaces into a single slot. That way, the user only sees a single option per time slot, and the option disappears once all the resources within the slot have been filled. It’s possible to do that with SuperSaaS but it’s a bit of work to set it up. These are the steps:

  • Create a new schedule from the Dashboard, this time choose the “Service” type
  • Define a single service with the number of time slots you want
  • Define that the service is only available if “Any one of…” your resources is available
Step Test the schedule from a visitor’s point of view

Test the event schedule from a participant’s perspective to ensure it behaves as expected. You will need to switch between administrator and user access, which is discussed in more detail under Testing the schedule you created.

You can create a booking as a user and delete it once you have checked that your online event schedule works.

Every schedule has its own URL, which can be viewed under Overview. If you want to direct a customer straight to a specific schedule, then you can copy/paste this link to an email or SMS.

Queue example
Step Make sure your customers can find your queue

Once you have configured your virtual queue and have tested it to ensure that it behaves as expected, you are ready to direct your customers to it.

There are a few ways you can share your queue:

  1. Create a QR code, print it out, and hang it on the shop window
  2. Put a link on your site that redirects people to your schedule
  3. Add a ‘Book Now’ button to your own site and/or social media channels
  4. Put a widget on your own site that allows people to stay on your site while they book

Find out more about this in the documentation outlining how to integrate a schedule in your website.

If you’d like to change the appearance and color scheme of your schedule, you can learn more about how to do this and other formatting options here.