Manage appointments and customers
The Supervise section of your appointment schedule is where you can manage your schedule on a daily basis. This is where you can review, approve or reject bookings and keep track of how your schedule is being used with daily, weekly, or monthly reports.
For more control over your users, head to the User Management section in the main dashboard. Here, you can view and edit individual user details and even book appointments on their behalf. If you selected a different term for your users, such as “clients”, this section will then be named Client Management.
On the User Management screen, you will also find Import and Export. These features enable you to import and export user data in various formats to and from your account.
On this page you will find the following:
Review your bookings
Via Supervise > Overview, you can review all your upcoming appointments. You can access an overview of old and deleted bookings via the Show history and Show trash links respectively. The overview can be sorted by clicking the column headers. If your schedule has multiple resources or services, a drop-down menu is available to filter appointments by resource or service.
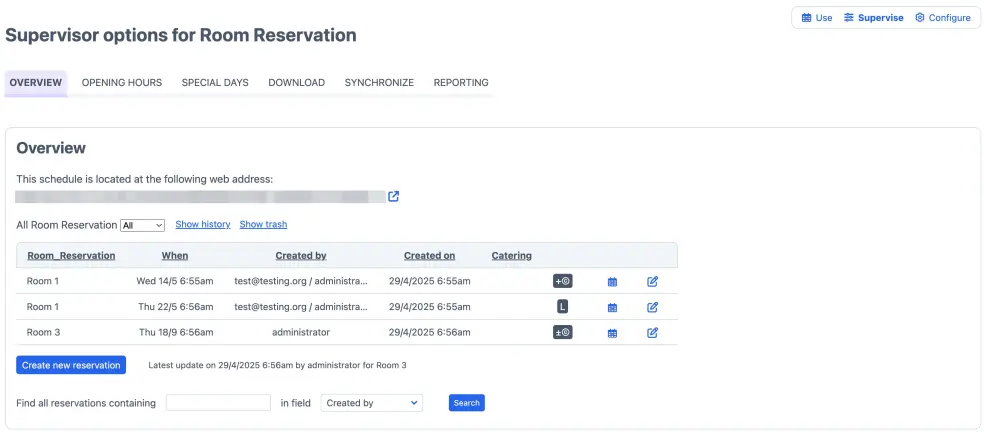
Using the search bar below the overview, you can find the reservations for a particular person in your appointment schedule.
The information shown in the overview is configurable via Configure > Layout. Here you can select any of the required and optional booking detail fields, including custom fields, to be shown as columns in list views such as this overview.

To the right of each entry, you will see two or more icons. Clicking the schedule icon will show you the appointment/slot on the schedule, while the edit icon allows you to make changes to the appointment/slot (see below). In a capacity schedule, the spyglass icon allows you to zoom in on the reservations for a particular slot.
For appointment schedules with payment or approval configurations, the system also shows a column with symbols such as or . You can hover over the symbol to see a pop-up with an explanation of the symbol, and you can also view the list of all the status codes.
Approve bookings manually
If you work with administrator approval, you’ll notice a few helpful indicators in the booking overview:
- for pending bookings
- for approved bookings
- for approved bookings paid with credit
To view all pending bookings at once, click ‘show pending’ in the control menu. This option only appears when approval is enabled. In the appointment schedule, pending bookings are displayed with lighter shading, so they’re easy to spot. Administrators can also choose to receive an email notification for each approval request (see Configuring the booking process).
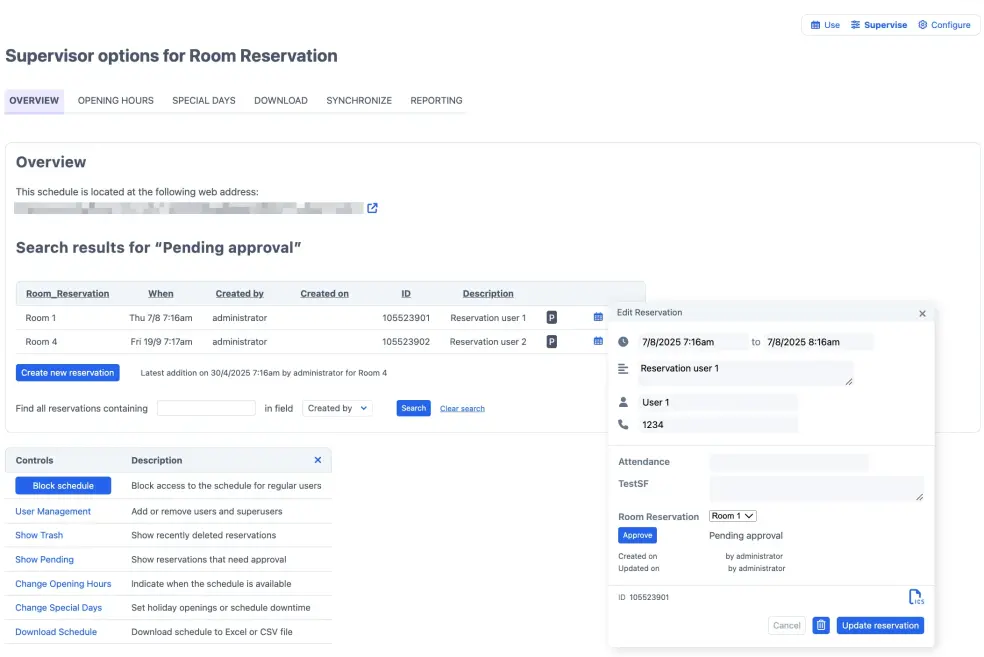
To approve a booking, click on the edit icon for that particular appointment. In the pop-up that appears, you will see the booking’s status in blue and the option to it. If the booking has already been approved, you will see the option to , which allows you to revoke your approval, if necessary.
Note that superusers also have access to the booking overview. By default, superusers are able to approve bookings in your appointment schedule. This can be changed, if necessary, via Configure > Access, by unchecking (see also Superusers’ access rights).
Make appointments on someone’s behalf
If you receive a booking by phone or email, you may want to add it to the calendar manually. However, since you’re logged in as the administrator, the booking will be recorded under the administrator by default. To make the booking for someone else, you can use the ‘act on behalf of’ feature.
While acting on behalf of a user, you retain your own permissions. If regular users can only see limited information, you will still be able to see all information about other users while acting on their behalf. If email confirmations are configured, you will see a checkbox that determines whether a notification is sent when booking on someone’s behalf.
Acting on behalf of a user via User Management
You can only act on behalf of registered users and will need to create a new user if that person is not already registered. You can create a new user on the User Management page. Next click the blue icon to the right of the user’s details. This will take you to your dashboard, where you can select the schedule you want to use for the booking. In the top bar, next to your own username, you will see the username/email address of the person on whose behalf you are acting. If you now make a booking, it will be listed with their name followed by a slash and the name of the administrator or superuser who created the booking. This ensures that the booking gets listed in the user’s schedule and automatic confirmation and reminder emails are sent to them, if these have been configured.
Acting on behalf of a user via the schedule
Another way to act on behalf of a user is by navigating directly to the schedule. In the top right corner, you will see the same icon as on the User Management page, but in black. When you click on this icon, a text field appears with the description ‘Act on behalf of a user…’.

In this field, enter the name of the user for whom you want to make an appointment. After entering the username, click the green check mark. The black icon then changes into a blue icon, and the user’s name appears. This indicates that you are now acting on behalf of this user and can make a booking.

If the user for whom you want to make a reservation does not yet have an account, enter the name in the text field and click ‘Add User’. You will then be automatically redirected to User Management to create the user account. After creating the account, you are immediately acting on behalf of this user.
Stop acting on behalf of a user
To stop acting on behalf of a user, click on the user’s name in the menu at the top right of the page.
Acting on behalf without user accounts
If your appointment schedule does not require users to register, you won’t be able to act on their behalf. However, you can still create appointments as administrator and then send confirmation emails to unregistered users. To do so, make sure that is unchecked in the Access Control settings, and enable the email field via Configure > Process. This will allow you to enter an email address for each booking you create as administrator.
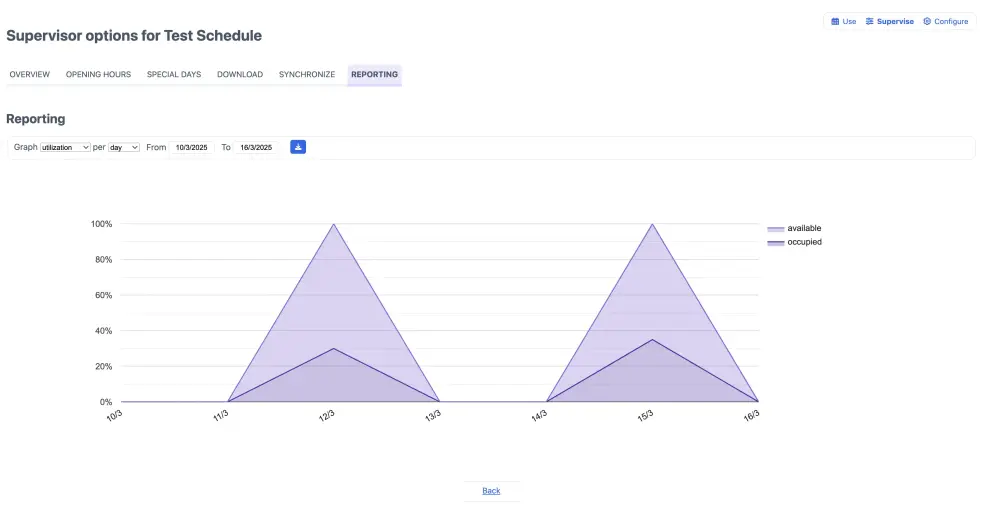
Reporting
You can access several standard reports via Supervise > Reporting. Using the various selectors, you can gain insight into overall booking behavior and utilization per day, week, or month over a specific time period. The data that is used to generate the chart/report can be downloaded in CSV or XLS format by clicking .
If you’re only looking for raw booking data for a specific time period, use the download option under Supervise > Download instead. This data can be used to generate your own custom reports in Excel, Numbers, or Google Sheets for your online appointment scheduler.
User management
Customer or user details can be accessed via User Management. User Management allows you to view and manage all customer and user details within the system. From this section, you can edit user information, adjust credit balances (if the credit system is enabled), assign roles such as superuser, or restrict access entirely.
When you work with the credit system, you can use the edit option to manipulate individual users’ credit. In the same way you can change a user’s role from regular user to superuser or block them from accessing your reservation system altogether.
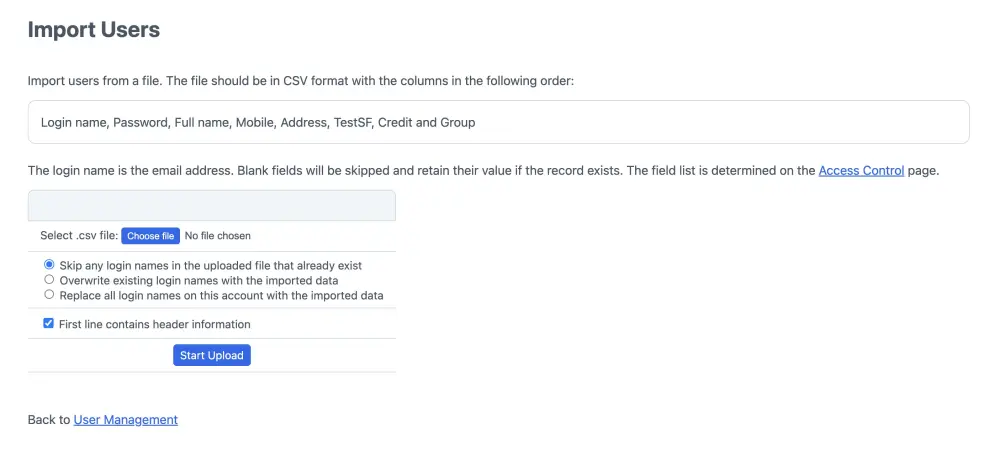
Importing or exporting users
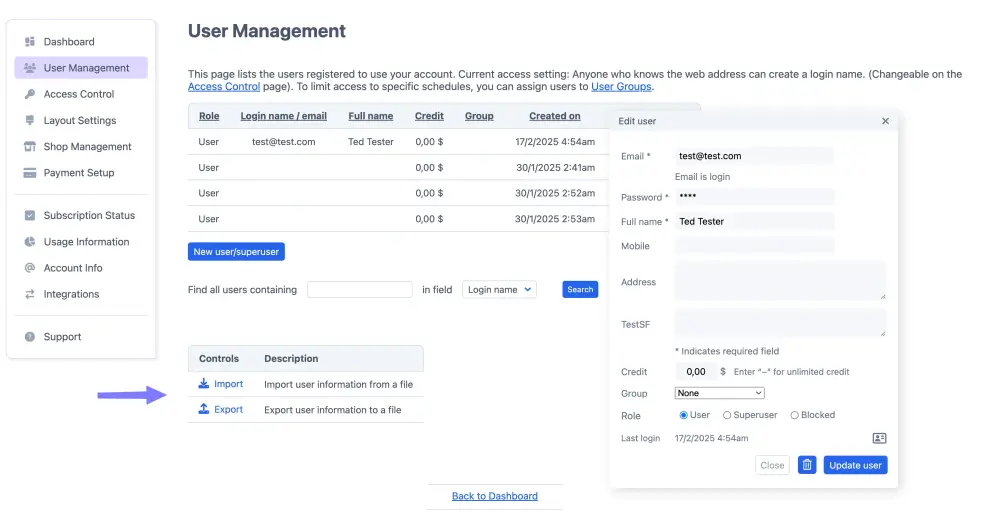
You can export user registration details from User Management by choosing Export on the User Management page. The Export feature supports several formats, including CSV, XLS, XML, and VCF/vCard.
To make bulk changes to user data, export the customer database as a CSV file. After editing the data, save the file and upload it back to the system via Import. Only comma-separated (CSV) files are supported for Import, to import an Excel file save it as CSV.
Troubleshooting
If, during file import, you see an error like “Malformed CSV: invalid byte sequence in UTF-8”, check the following:
- Please make sure that you have saved the file in CSV format.
- Sometimes letters with diacritic marks such as “é” cause errors. These marks can be manually removed, but it is generally quicker to import the file into Google Sheets and to download the CSV file from there. You can also upload the file to Google Drive, open it with Google Sheets, and then download the CSV file.