Configure the booking process
Should users be allowed to make repeat bookings or not? Do bookings require payment or approval? Should new bookings be confirmed? To whom? And what about reminders and follow-up emails? The SuperSaaS system offers you fine-grained control over each of these aspects of the booking process by letting you:
- Enable Repeated Bookings
- Decide whether payment and approval is needed for an appointment
- Connect to a video conferencing service for online appointments
- Configure confirmations and reminders for both email and/or SMS
- Design the process upon completion of a booking
Repeated bookings
By default, users can create only one booking at a time. However, both Resource and Capacity schedules can be configured to allow repeating bookings, so that users do not have to create each booking separately.
Resource Schedule
- Navigate to Configure > Process
- Select
- Press
When booking, users will now have the option to repeat their booking daily, weekly, bi-weekly, monthly by date or monthly by day, all until a specific end date.
Capacity schedule
When setting up a new time slot on a schedule, the administrator (or superuser) can make it repeat daily, weekly, every two weeks, or every month (by date or by day) until a set date. Only when a slot itself repeats and the schedule is configured accordingly, can users make recurring bookings.
To allow users of a capacity schedule to make repeat bookings, follow these steps:
- Navigate to Configure > Process
- Depending on whether users should be able to pick their own repeat frequency or have to sign up to all repeating slots, i.e. all classes of a course, select the appropriate option under Can a user make repeating reservations?
- , or
- Press
Payment and approval
Depending on how you want to use your schedule, you can decide to approve bookings or require payment before confirming them. To set this up, go to Configure > Process and adjust the settings under Require payment or approval?.
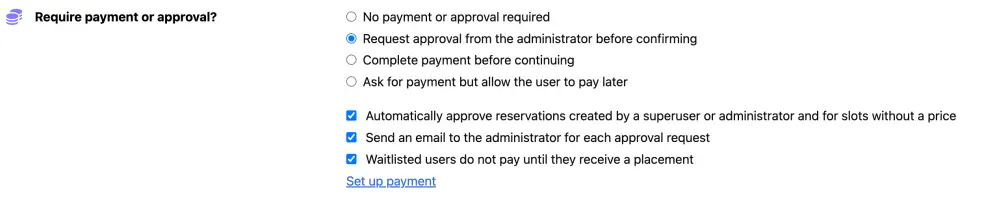
Under Require payment or approval? there are several options to choose from:
- this option is selected by default.
- is the option to use if you would like to approve bookings manually. Appointments are then marked as tentative, and the administrator (or superuser) must confirm the booking before it is final and a confirmation is sent. Upon selecting this option, a new option, , will appear. Check this option if you want to be notified by email of every new booking pending approval. On the schedule, pending bookings are shown with a lighter shading and are marked with a in list views such as a user’s agenda.
Note that the option to automatically approve reservations created by a superuser or administrator is set by default.
The last two options are focused on the payment options during the booking process. It is not possible to ask for payment and approval for bookings.
- Use the option if you want to ask for (partial) payment and automatically approve (and confirm) reservations once it is received.
- can be used if you want to give your users the option to pay later. For more information on how to set up the payment process, please refer to the Payment section.
only appears in Capacity schedules. This is the only schedule that allows overbooking. With this option you allow users to only pay once they’ve secured a spot.
Connecting to a video conferencing service
SuperSaaS offers several ways to connect with (video) conferencing services like Google Meet, Zoom, Jitsi Meet and Microsoft Teams. The system can automatically create meetings in Google Meet and Zoom. Alternatively, you can manually add meeting links to these or any other conferencing service.
The meeting links are kept hidden from the user until they are registered for a class or have created an appointment. Meeting links will be added to confirmation and reminder emails automatically. Please refer to the section on Video conferencing for a detailed explanation of the setup.
Confirmations and reminders
The SuperSaaS reservation system allows you to send email and/or SMS notifications and reminders. These can be used to confirm bookings to users or notify yourself of new or updated bookings.
Confirmations
By selecting under Configure > Process, you can choose to send a confirmation to users once their reservation is approved. Users will also be notified of any subsequent changes they make to their bookings or when they delete them altogether. If you want to leave it up to users themselves whether a confirmation should be sent, select instead.

Once you have activated this option, you can edit the content of this message via Configure > Layout (see also Customizing messages and notifications).
To ensure notifications can be delivered, you may want to verify the email addresses users provide upon registration; this can be done via Access Control. If you do not work with registered users, then at least make sure that the users’ email address is collected upon booking. Also verify that the option under Access Control is not checked.
Please refer to the Daily use section for more information on confirmations when acting on a user’s behalf.
Reminders
In addition to email confirmations, you can send your users a reminder prior to the start of their appointment or booking. If you set up an SMS gateway (see below), you can choose between email or SMS reminders. In case of the latter you need to make sure that you collect users’ mobile phone numbers upon registration and/or booking. Note that several SMS notification options will be hidden unless you have an SMS gateway set up.

The system also allows you to send users a follow-up email, some time after the start of their appointment or booking. Once you have activated this option, you can edit the content of this message via Configure > Layout (see also Customizing messages and notifications).
Setting up an SMS gateway
In order to send SMS notifications, you need to have an SMS gateway set up. SuperSaaS does not sell SMS credits, but offers integration with numerous national and international SMS providers (see below for a selection of such providers).
Once you have created an account with one of them, go to the Integrations page and click SMS Gateway to provide your account credentials such as your username and password. If your SMS provider requires you to specify a gateway type, then select HTTP.

Make sure you enable the SMS gateway by checking and saving your changes. The SuperSaaS system will then verify your account credentials with your SMS provider. A status message at the top of the page will indicate success or failure.
Other notifications
Whether you work with administrator approval or not, you can configure the system to notify you and others about new or updated bookings. You can choose to be notified by email for every individual change or receive an overview once a day. To send these emails to multiple people at once, enter their email addresses in the text field, separated by commas.

If you have set up an SMS gateway (see above), you can also send notifications of new or updated bookings to one or more mobile phone numbers. This is especially useful when you want to be notified of last-minute changes to your schedule.
Process upon completion of a booking
Via Configure > Process you can control where users are taken and/or what page they are shown upon completing a booking. By default, a user remains on the schedule page after completing a booking. The new booking is highlighted on the schedule and above the schedule a message is shown indicating that the booking is created successfully.

Alternatively, you can send the user to their agenda, where they find an overview of all their upcoming bookings. Another option is to provide a URL where users are redirected to upon completing their bookings. It is recommended that the page users are redirected to clearly shows that their booking was completed successfully. Redirecting users to your homepage without any confirmation is confusing for your users.
$name, $id, $price, $slot_id, $email, $lang or $full_name in the URL, which will be replaced by the appointment’s login name, ID, price, slot ID, email or full name respectively.
You can then extract that information with a script on the page where you send the user to, to collect that information, or save it in a server log to process later.
Via Layout Settings you can specify the URL where users are taken when they log out from SuperSaaS (or click your logo, provided it is shown). This can be a different URL and using your homepage would be appropriate here.